Archive for the ‘eyelashes’ Category
 August 24, 2008

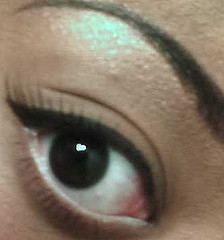
- Eyeshadow Base: Ulta Eye Primer
- Lid: Smashbox eyeshadow in Bronze
- Inner crease: Smashbox eyeshadow in Bronze
- Outer crease: Artistry eyeshadow in Espresso
- Browbone: Artistry eyeshadow in Spun Silk
- Inner lower lashline: Smashbox eyeshadow in Bronze
- Outer lower lashline: Artistry eyeshadow in Espresso
- Upper lashline: Artistry eyeshadow in Black Tie as eyeliner
- Eyelashes: Ardell false eyelashes in Babies (black)
Posted in artistry cosmetics, beauty, cosmetics, create this look, eyelashes, eyeliner, eyes, eyeshadow, false eyelashes, personal tips, tips & tricks, women of color | Tagged ardell false eyelashes, artistry cosmetics, create this look, make up shorts, smashbox cometics | Comments Off on Make Up Shorts ; Create This Look
June 14, 2008

- Browbone : MAC All That Glitters eyeshadow
- Upper lashline : Artistry Black Tie & NYX Black eyeshadow applied with a damp thin liner brush
- Lower waterline : NYC White pencil eyeliner
- Eyelashes : Ardell #305 false eyelashes on top lashes & Artistry Essentials Black mascara/Artistry Waterproof Black mascara on lower lashes
More pictures here
Posted in ardell false eyelashes, artistry cosmetics, artistry essentials, beauty, cosmetics, create this look, eyelashes, eyes, false eyelashes, MAC cosmetics, NYC color, NYX, Uncategorized, women of color | Tagged ardell false eyelashes, artistry cosmetics, artistry essentials, create this look, false eyelashes, MAC cosmetics, NYC color, NYX | Comments Off on Make Up Shorts ; Create This Look
June 14, 2008

I admit, during my early days of high school..I was scared of false eyelashes. With the different brands, lengths, styles, it can be overwhelming for first time false eyelash users. Don’t fret! Here’s your guide to the world of false eyelashes
Types Of False Eyelashes

Strip Lashes – These lashes come two in a pair and come in a variety of lengths, thickness, colors, etc.

Separate Flares – These lashes are the half versions of the strip lashes. They are applied to the outer edge.

Individual Lashes – These lashes come in two varieties : regular or clusters. These are the most natural looking out of all the lashes and create a more fuller look for your natural lashes. When applying individuals, you have to apply one lash or cluster at a time.
Types Of Glue
- When applying individual/cluster lashes, you need to use individual eyelash adhesive. This adhesive secures the lashes for up to 6 weeks if taken care of properly.
- When applying strip or flares, you need to use a regular eyelash adhesive such as DUO. Duo adhesive is a great brand to use because when using this adhesive on my lashes, they stay on securely without lifting at the edges by the end of the day.
Tutorial On How To Apply False Eyelashes
- This tutorial is by far my favorite for false eyelashes. Complete with pictures and detailed step by step’s.
Removal & Keep Up
- Do not tug on the lashes. If you do, chances are you might be pulling off your real lashes too. That’s never a good thing.
- You can invest in false eyelash/make up remover or you can simply use olive oil or virgin coconut oil to loosen up the lashes.
- To clean your lashes, put a few drops of water til the glue on the strip loosens
Tips & Tricks
- Apply false eyelashes after doing your eye make up.
- Use mascara before and after applying the false eyelashes to blend into your natural lashes.
- If you plan on wearing eyeliner, use an eyeliner that doesn’t smudge easily or simply opt to using liquid eyeliner or using an dampen thin liner brush + eyeshadow. The last thing you want is smudged up eyeliner after applying your eyelashes.
- False eyelashes too big? Just cut a little bit of the lashes on the inner edge to best fit your eye shape.
- If your wearing a lot of eye make up and want to wear false eyelashes, use natural looking lashes like Ardell’s #109 (one of my personal favorites: pictures here & here of the look).
- Don’t feel like wearing mascara, but feel like you need to wear something? Use Ardell’s #305 flare lashes paired up with a black winged out eyeliner for lazy make up days (one of my new favorite looks + lashes).
- Practice makes perfect! Practice applying lashes on during your free time to get hang of false eyelashes and to see which lashes best fits your eyes.
- Remember ladies: Stock up on lashes, you can NEVER have too many!
Posted in ardell false eyelashes, beauty, cosmetics, eyelashes, eyes, false eyelashes, personal tips, tips & tricks, Uncategorized | Tagged ardell false eyelashes, false eyelash how to's, false eyelash tips & tricks | Comments Off on False Eyelashes 101
June 2, 2008
I’ve been stuck on greens all last week (as you can tell from my current Create This Look). Here’s my tutorial for my favorite green look:

1) Apply an eyeshadow base (I used NAO’s concealer/eyeshadow base) on the entire lid, passed the crease, and up to the browbone.

2) Apply a light beige green eyeshadow (I used MAC’s Equibeige eyeshadow) to the inner lid. Apply a bright green eyeshadow (I used NAO’s Arrant/Fled eyeshadow duo; I used the green side) on the outer lid.

4) Apply a olive green eyeshadow (I used Milani Antique Gold eyeshadow) to the crease and blend up to the browbone. Apply a matte black eyeshadow (I used Artistry Black Tie eyeshadow) on just the outer crease.

5) Use a brown eyeliner as a base and apply it to the lower lashline 1/3 of the way. Apply a dark brown eyeshadow (I used Artistry’s Espresso eyeshadow) on top of the eyeliner. Apply an eyeshadow base to the inner lash line and then, apply a light beige eyeshadow on top. Use a light shimmery beige as a highlighter on the browbone. Finish off with a few coats of black mascara on both the top & bottom lashes. You can also use a white pencil eyeliner on the bottom waterline like I did. That’s completely optional.

The finished look
Posted in artistry cosmetics, artistry essentials, beauty, cosmetics, eyelashes, eyeliner, eyes, eyeshadow, MAC cosmetics, make up tutorial, Milani, NAO cosmetics, personal tips, step by step look, tips & tricks, women of color | Tagged artistry cosmetics, artistry essentials, green look, MAC cosmetics, make up tutorial, Milani, my how to's, NAO cosmetics | Comments Off on My How To’s – Green Look Tutorial
June 2, 2008

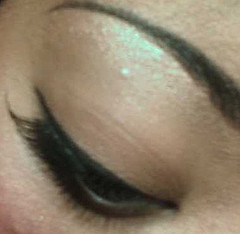
- Eyeshadow Base : Ulta Eye Primer
- Lid : NYX Lime Green eyeshadow & NAO Arrant/Fled (the green eyeshadow; on top of NYX Lime Green)
- Outer crease : Artistry Black Tie eyeshadow
- Very outer lid : Artistry Black Tie eyeshadow
- Browbone : Artistry Spun Silk eyeshadow & MAC All That Glitters eyeshadow
- Upper lashline : Artistry Black Tie eyeshadow applied with a damp thin liner brush
- Lower waterline : MAC Blacktrack fluidline
- Eyelashes : Artistry Essentials Black mascara & Artistry Waterproof Black mascara
Posted in artistry cosmetics, artistry essentials, beauty, cosmetics, create this look, eyelashes, eyeliner, eyes, eyeshadow, MAC cosmetics, NAO cosmetics, NYX, Ulta, women of color | Tagged artistry cosmetics, artistry essentials, colorful eye looks, create this look, MAC cosmetics, NAO cosmetics, NYX | Comments Off on Make Up Shorts ; Create This Look


You must be logged in to post a comment.